Showing posts with label Wireless Monitoring. Show all posts

Saturday, August 18, 2018

Can You Hear Me Now? Breaker Breaker 1... 9.....

For this post, I would like to discuss keeping in touch with the family while camping.  Many people in the good old days, used string and two soup cans or a CB walkie-talkie to keep in touch with family members during camping.  Most of the campers in the olden time and even RVers today, nothing was or is used to stay in touch.  While some may believe that a cell phone is good enough, and it may be traveling down the interstate, in a campground in the wilderness or at the nearby lake you may find that the good old cell phone does not work, even a little.   You may find that the carrier you have is the wrong carrier for good service in the area that you are in and that the other guy would have been a better choice.  Whatever the case, today we have very small radios called FRS/GMRS that will last a long time on batteries, give you several miles of range, be quiet and can even be set up for "selective call" so only your family members will hear you when you call them in for lunch or are backing up the rig.  RVers who are backpackers take note, these little radios can have weather radios and GPS built-in as well.


Let's take a look at a few [shown below] and discuss their features and benefits in more detail.

Shown above are some Basic FRS radios.  They come as a pair when you buy them and have the following feature set.  The units come with rechargeable batteries, two belt clips, charging cable, AC adapter and have a range of 20 miles over flat and open terrain.  They offer a 12hr battery life.  As you can see the unit does not offer a lot of features but it works and could be used when backing the RV into that tight site, right next to the lake.


Above is shown a step-up model of an FRS/GMRS radio.  It can run on alkaline batteries for up to 10hrs or 8hrs on rechargeable batteries.  This model from Motorola includes 11 weather channels, 22 talk channels, and each channel has 121 privacy codes, (selective call)  for privacy.  The range is 23 miles over flat and open terrain.  It comes with belt clips and 1 dual drop-in charger to charge the pair of radios at the same time to save you time.  Use one as a base station at the RV and give the other one to whoever you want to keep track of.  Additional units can be purchased so everyone who needs one has one.  This unit would be great for a fisherman to keep in touch while out in the boat on the lake.


 Calling all Backpacking RVers out there.  Here is an FRS/GMRS radio that has a built-in GPS or a GPS that has a built-in FRS/GMRS radio.  This unit is not low cost, but it does show that just about any need for communications while RVing can be met with an FRS/GMRS radio.  For the fun of it here are some of the features of this radio.  The radio has a 2.6-inch color touchscreen that is glove friendly.  A high sensitivity GPS receiver, a rugged waterproof case. Runs 18hrs on a set of batteries, and has a list of accessories as long as your arm. 
While most of us will want a lower cost unit you need not suffer from little to no features.  Range, the number of channels, the privacy feature (selective call), and battery life are the important ones to watch out for.
Safety and peace of mind make the weekend RV getaway fun and exciting for the whole family and the ability to stay in touch with all members of the camping party does that for me and my family.


Until next time.  Over and Out?

Thursday, April 26, 2018

Let's Check Those RV Tires Again!

 While some of us are still digging out of the winter storms, some of us are dreaming about the first warm weekend of the new camping year. So what do you do first with your stored RV?  Check the tire pressure with a good tire pressure gage.  The tire's max pressure is located on the side wall of the tires on your RV.  Do not use the pressures recommended by the RV manufacture UNLESS the RV has the original tires that it came with from the factory.


I use both a screw-on tire pressure indicator, such as Quick-Pressure-PSI-50-Monitor, which at a glance can tell you that you may have a problem [use only if your tires are supposed to have 50 lbs of air when cold. Other pressures are available]  and the traditional pencil like gauge, such as Pencil-Pressure Gauge
 Be sure to test or look at the tire pressure gage before you have moved your RV a mile.

You need to check the tire pressure when the tire is still cold
Another good, but pricey, system for monitoring your tire pressure as well as the tire temperature is the  Wireless Tire Pressure Monitoring System. I am saving for this one.

Wireless Tire Pressure Monitoring System

The system will tell you of an overheated tire, in most cases before it blows, and of course tell you of low pressure in any monitored tire, even the spare,  in real time no need to stop every 20 miles and check those darn tires - LOL.  When you stop for gas or a bathroom break you should do a tire check of the RV as well as a tow vehicle. My daughter was checking the tow vehicle for me and found a large cut in the sidewall of the truck tire.  We were able to get the tire replaced before the large accident occurred.  I did not even remember hitting or running over anything on the highway.
Be sure to carefully look at the tread, and the side walls both on the front and the back of the tire.  Most RV tire experts agree that if your tiers are more than five years old from the date of manufacture you should replace them.  Most tire failures occur when the side wall of the tire is under inflated or rots out from the inside where you can not see.  You can thank Mr. Sun for sidewall failure in some cases.  Most tires have a Sun inhibitor built-in but when a tire sits and sits the inhibitor does not get moved to the outside of the tire by the tire going round and round.

Now you see why you need wheel covers right? Trailer Wheel Covers for less than $25.  To protect the tires in storage from Mr. Sun and any other nasties that come along.
You can also use an RV tire protective spray which is applied, as directed, to the tire sidewall that is exposed to the sun.  I have used RV Tire Protection Spray with good luck.  This spray is NOT designed to make the tire sidewall shinier, it is not a decorative spray, but something that is designed to put back into the surface of the rubber what Mr. Sun is taking out.
RV Tire Protection Spray
Also, note that if you are going to store the RV for an extended period of time you should protect the tread from the surface that the tires are sitting on.  Nasty things can leach out of your tires into the blacktop or concrete that your RV sits on while being stored. Or from the blacktop or concrete into your tires during storage.  You can use an  Office Chair Mat that sells for less than $20,
for each side of the RV and just back onto it as you are putting the RV away.
Or you can Go to Tractor Supply or any farm supply and pick up horse stall mats

Cut to the size you need for just $20.  Now that is easy.

If you are supposed to replace your tires every five years how do you know when your tires were made?  There is a code date molded into the side wall of the tire. (you can thank our government)   The National Highway Traffic Safety Administration (NHTSA) requires that Tire Identification Numbers be a combination of the letters DOT, followed by ten, eleven or twelve letters and/or numbers that identify the manufacturing location, tire size, and manufacturer's code, along with the week and year the tire was manufactured.  Since 2000, the week and year the tire was produced has been provided by the last four digits of the Tire Identification Number with the 2 digits being used to identify the week immediately preceding the 2 digits used to identify the year.

Below is an example of a tire manufactured since 2000 with the current Tire Identification Number format:
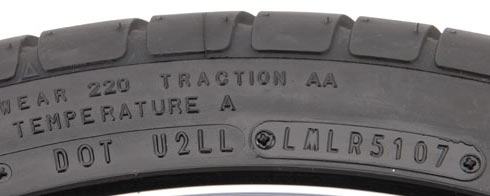
In the example above DOT U2LL LMLR 5107
DOT U2LL LMLR 5107 Manufactured during the 51st week of the year
DOT U2LL LMLR 5107Manufactured during 2007
While the entire Tire Identification Number is required to be molded onto one sidewall of every tire, current regulations also require that DOT and the first digits of the Tire Identification Number must also be molded onto the opposite sidewall. Therefore, it is possible to see a Tire Identification Number that appears incomplete and requires looking at the tire’s other sidewall to find the entire Tire Identification Number.
I know you are saying to yourself,  but the RV is only three years old.  We are not talking about the year your RV was built, but the year the tires were manufactured and they may be not the same so please check.   If your tire's serial number cannot be read by you, then you need to take the tire or RV to an RV dealer or tire shop and have the tires read.  Please do not be pulling your RV with old tires that may jeopardize your families safety as well as others.   [If you want more information on tire markings and such go to Tire Tech Information]

Ok, you have checked the date code of your tires and they are in fact only three years old.  Tire pressure is up and you're ready to go.  Not so fast!

We need to discuss lug nut tightness.  Each Spring or before a major trip you should check the tightness of the lug nuts on each of the RV tires.  You need to check your owners manual for the correct setting.  My 5er has the specifications of 100ft LBS.  I use an inexpensive torque wrench, which I keep in the RV toolbox, to confirm the setting. 1/2' Torque Wrench  To keep the wrench outside of the tire rim I also use an extender. 1/2" Socket Extension The socket size depends on your lug nut size.

Tire Check Quick Guide 
1. Check all RV tires for max pressure listed on the tire sidewall.
2. Check tire tread and sidewalls for wear and cracks.
3. Cover tires from sun damage when not using.
4. Keep tires off of storage surface during storage.
5. Check the age of tires yearly.
6. Check your tires every time you stop.
7. Do maintenance on your tires as needed.
8. Check lug nut tightness.


Until Next time.


Friday, January 20, 2017

Sleep Better In Your RV

I am sure a bad nights sleep in our RV has happened to all of us at one time or another. While some of us may have just moved to a new site location, others of us have had to stay where we were and suffered or NOT.  Let's look at some things we might do to get a good nights sleep in our RV even if outside forces are working on us to keep us awake.


First we will start at the top and work our way down in the comfort area.
1. Do you have comfortable pillows?
Gel-Fiber Filled
Here are some of the features of this type of pillow.
  • Set of 2 standard-size hypoallergenic down-alternative pillows
  • Polyester gel fiber fill with great loft recovery and no-shift construction
  • Provides comfortable support for back, side, and stomach sleepers
  • 370-thread-count, 100-percent mercerized cotton shell with jacquard pattern
  • Machine wash and dry for easy care; backed by 1-year limited warranty

Many people have found that if you have to fight every night with your pillow to get comfortable that you may never have a restful sleep.

2. You need comfortable sheets that fit the bed and don't drift around as you sleep.  Most RV beds are not the same size as their sticks and bricks cousins. So when you buy a Queen size sheet set for your RV the bottom sheet will not fit.  What is a person to do?  Well check out the Bed Bands these clips.

The clips hold the bottom fitted sheet in place and keep the bottom sheet from moving around while you sleep. 

Ok we have solved the pillow problem and the sheet problem whats next?

3. The mattress of course.  I am not suggesting that you go out and replace the mattress, but you might want to add a Mattress Topper.


The topper sits on the RV mattress and gives you that memory foam feel.  "It's like floating on a cloud", and is very comfortable.  You can cut the foam to fit your RV bed by using a very sharp knife or an electric carving knife.

Now that you are warm and comfortable but still not sleeping we can begin to look around for what else is keeping you awake.  If you have a exit door in your bedroom you will need to block out light that maybe getting in from your neighbors yard lights or fire pit.  You will need a Reflective Door Window Cover shown below. This cover is removable and eliminates the light and reduces the heat getting into the bedroom.

But you still can not get to sleep.  Maybe a Sleep Mask  would help. It sure will be dark in there.

Still having trouble getting to sleep?  What else is there, NOISE lots and lots of it in some parks. So lets take a look at what you could do to reduce the noise so you can sleep.  I suppose you could move to a different site or even a different campground, but that may not be possible.
Ear Plugs are a possibility, but here is where I get concerned about safety.  Many of the safety alarms in an RV[Smoke;Gas] depend on you hearing them to be effective.  If your ears are plugged and you can not hear the alarm that is not a good thing.  Here are some typical ear plugs .

You could turn on the RV furnace fan to create some background noise. 
This friendly background noise is call White Noise and is supposed to cover up the outside noise that is keeping you awake.  While this is a method that I have used in the past, the furnace fan solution could cause an early furnace fan failure or maybe shorten the fan's motor overall life causing it to die an earlier death than one would normal expect.  This method of generating white noise is not really a good one even if it works.  You could buy a cheap fan and have it running in the bedroom to generate some white noise.  While a better idea, you now have moving air which may not be what you want blowing across you while you are sleeping.   
The best method of white noise generation for your RV is a Sleep Machine.  You can go with the following deluxe model of Sleep Machine
  • Incredibly small device only 2.5 inches tall
  • Nomad can be operated with two AA batteries or the supplied AC adapter
  • In Nomad External Mode you can listen to your mp3 player, movie soundtracks, etc
  • Six (6) relaxing soundStories to promote deeper sleep, relaxation and renewal: Waterfall, ocean, meadow, rainfall, brook and noises (white, brown, pink and fan)
  • ASTI Adaptive Sound technology listens and responds to each users environment for disrupting sound

Or you can go a bit cheaper on a Sound Machine
  • Natural sounds help you relax while you read, work, study or sleep
  • Six sounds: ocean, summer night, rain, thunder, white noise and brook
  • 15, 30 and 60 minute auto-off timer
  • Compact and lightweight for travel
  • Battery or adapter operated (adapter included, 4?AA? batteries not included)


The idea is the same either way.  To substitute a friendly sound that will cover up the bad sounds preventing you from getting the sleep you need to enjoy your camping time.
I am sure there are other things you could do to help yourself get to sleep, a nice glass of warm milk maybe a good idea, if you like milk.  Maybe a nice glass of wine just before going to bed would help or reading a dull book or RV column might help. When ever it takes get a good nights sleep you will thank me in the morning.


Until next time.


And finally, please remember that this blog is an Amazon affiliate. When you order something through any of the Amazon links, it doesn’t add anything to your cost, but I do earn a small commission on everything you buy. Just click on an Amazon link, then shop as usual.